
User Notifications
User Notifications lets you define rules that automatically send in-app (and optionally push) notifications to users when specific events occur, such as completing a lesson or being added to a circle.
Notification rules overview
Section titled “Notification rules overview”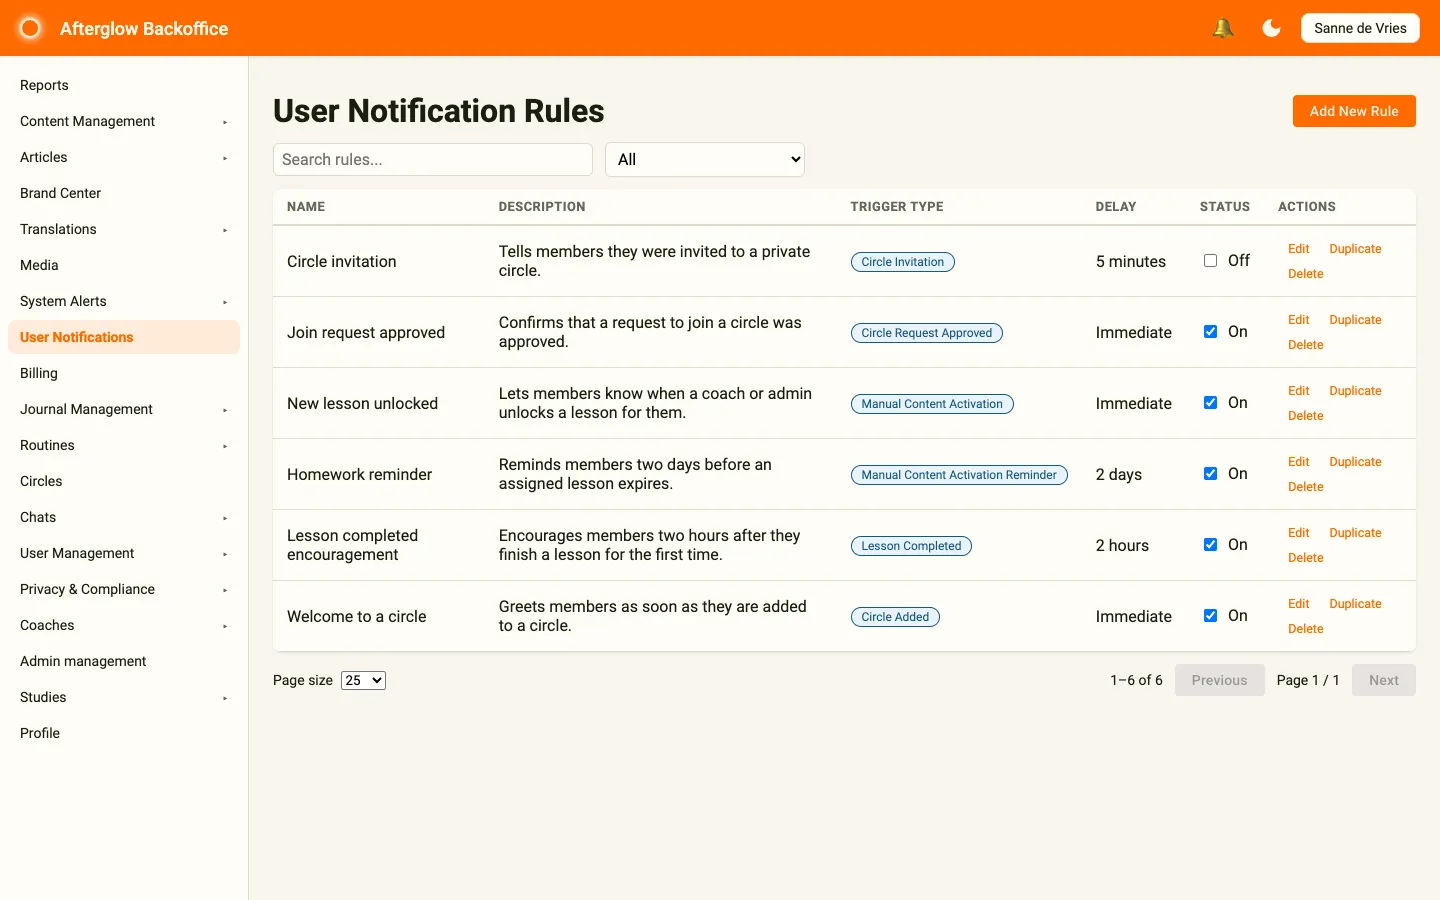
Open the overview from the sidebar by selecting User Notifications. The User Notification Rules page lists every notification rule in a table. Use the Search rules… box to search by name or description, and the status dropdown to show All, Enabled, or Disabled rules.
Each row shows:
- Name – the rule’s display name.
- Description – a short internal note explaining the rule’s purpose.
- Trigger Type – the event that fires the rule (shown as a chip).
- Delay – how long after the event the notification is sent, or “Immediate” if there is no delay.
- Status – an On / Off toggle that enables or disables the rule without deleting it.
- Actions – Edit, Duplicate, or Delete the rule.
Use the Add New Rule button in the top-right corner to create a new notification rule. Use the page size selector and the Previous / Next buttons to move through longer lists.
Quick actions
Section titled “Quick actions”- Enable / Disable – flip the status toggle in the row to start or stop a rule instantly.
- Duplicate – creates a copy of the rule. The copy is disabled by default so you can adjust it before activating.
- Delete – permanently removes the rule after a confirmation prompt.
Creating and editing a rule
Section titled “Creating and editing a rule”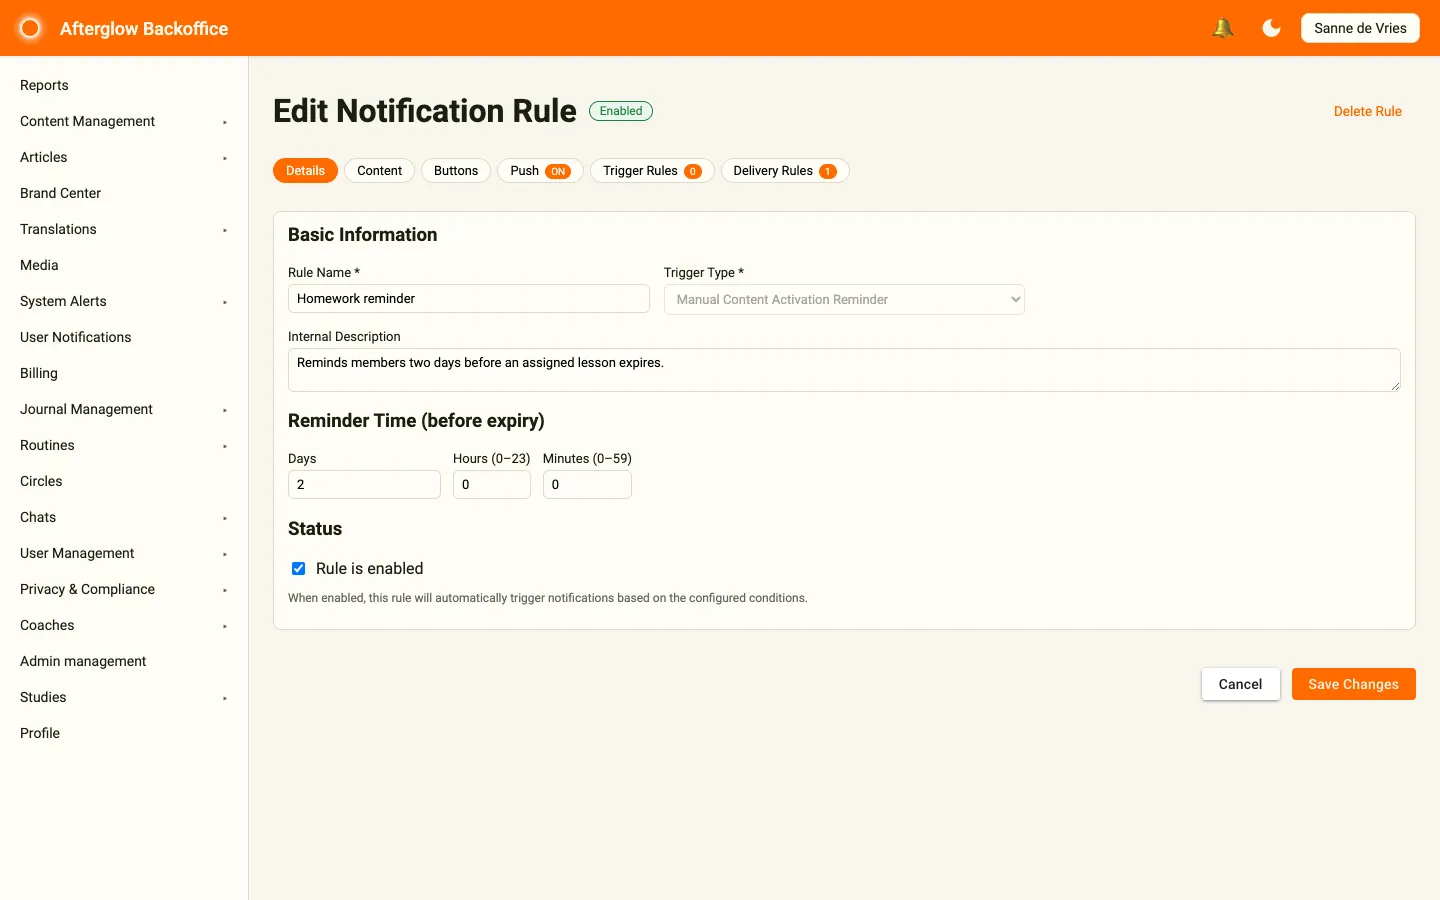
The rule editor (Create Notification Rule or Edit Notification Rule) is organized into six tabs: Details, Content, Buttons, Push, Trigger Rules, and Delivery Rules. Each tab focuses on a different aspect of the notification. Small badges on the tabs show whether push is ON and how many trigger and delivery conditions are set.
When editing an existing rule, a status chip (Enabled / Disabled) appears next to the page title, and a Delete Rule link appears on the right. At the bottom of the page, click Create Rule (for a new rule) or Save Changes to save, or Cancel to return to the overview without saving.
Details tab
Section titled “Details tab”The Details tab holds the core settings for the rule.
- Rule Name – a required display name for the rule.
- Trigger Type – the event that fires this notification (see the list of trigger types below). The trigger type can only be set when creating a new rule; it cannot be changed afterward.
- Internal Description – an optional note visible only to administrators.
- Delay (after event) – how long to wait after the triggering event before sending the notification, expressed in Days, Hours, and Minutes. Set all values to zero for immediate delivery.
- For the Manual Content Activation Reminder trigger type this section is called Reminder Time (before expiry), meaning the notification fires that amount of time before the activation expires rather than after the event.
- Status – the Rule is enabled checkbox enables or disables the rule.
Trigger types
Section titled “Trigger types”When creating a rule you must select one of the following trigger types:
- Lesson Completed – fires when a user completes a lesson.
- Manual Content Activation – fires when content is manually activated for a user.
- Manual Content Activation Reminder – fires a set time before a manual content activation expires.
- Circle Added – fires when a user is added to a circle.
- Circle Removed – fires when a user is removed from a circle.
- Circle Blocked – fires when a user is blocked from a circle.
- Circle Invitation – fires when a user receives a circle invitation.
- Circle Request Approved – fires when a user’s request to join a circle is approved.
- Circle Request Rejected – fires when a user’s request to join a circle is rejected.
Content tab
Section titled “Content tab”The Content tab defines what the user sees inside the notification.
- Media (optional) – click Select Media to attach an image from the media library. You can use Change Media or Remove Media at any time.
- Title – the notification headline (required). Supports template variables.
- Message – the notification body text (required). Supports template variables and translation keys.
- Preview Notification – opens a dialog that shows a preview of the notification with sample data filled in for each template variable.
Click Variables next to the Title or Message label to see all available template variables. Each variable has a Copy button so you can paste it into your text.
Template variables
Section titled “Template variables”Both the title and message fields support template variables. Wrap a variable name in double curly braces (for example {{CompletionCount}}) and it will be replaced with the real value at send time. Variables are case-insensitive. If a variable is not available in the notification context it remains unchanged in the text.
Common variables
{{EventType}}– the type of event that triggered the notification.
Lesson completion variables
{{CompletionCount}}– number of times this user completed this lesson.{{TotalLessonsCompleted}}– total number of lessons the user has completed.{{CompletedAt}}– date and time when the lesson was completed.
Manual content activation variables
{{LessonTitle}}– title of the lesson.{{LessonPublicId}}– public identifier of the lesson.{{ExpiryDate}}– date when the manual activation expires (if applicable).
Circle variables
{{CircleName}}– name of the circle.{{AddedAt}}– date and time when the user was added to the circle.{{InvitedByUserName}}– username of the person who sent the invitation (Circle Invitation trigger only).{{InvitationMessage}}– optional message included with the invitation.{{InvitedAt}}– date and time when the invitation was sent.
Buttons tab
Section titled “Buttons tab”Configure the action buttons that appear on the notification.
- Confirm Button Text – the label on the primary action button (defaults to OK). Uses multilingual text.
- Confirm Button Behavior – choose where the user navigates when tapping the confirm button. The default, Close window, dismisses the notification. Available navigation targets:
- Home
- Insights
- Content
- Journal
- Community
- Profile
- Show Cancel Button – check to display a secondary dismiss button.
- Cancel Button Text – the label on the cancel button (required when the cancel button is enabled). Uses multilingual text.
Push tab
Section titled “Push tab”Control whether a push notification is also sent to the user’s device.
- Send Push Notification – check to enable the push notification.
- Push Notification Title – the title shown in the device notification (required when push is enabled, max 50 characters).
- Push Notification Message – an optional override message for the push notification (max 100 characters). If left empty the main notification message is used.
When push notifications are enabled an ON badge appears on the Push tab.
Trigger Rules tab
Section titled “Trigger Rules tab”Trigger rules (When to Send) define the conditions that must be met for the notification to fire. A badge on the tab shows the current number of conditions.
Click Add Condition to add a condition. Each condition consists of:
- Logical operator (for the second condition onward) – AND or OR, controlling how conditions combine.
- Condition type – depends on the trigger type:
- For lesson-based triggers: Lesson (select a specific lesson) or Completion Count (a numeric value).
- For the Manual Content Activation Reminder trigger with delivery conditions: Activated Lesson Completed (checks whether the activated lesson has been completed).
- For circle-based triggers: Circle (select a specific circle).
- Comparison operator – Equals, Not Equals, Greater Than, Less Than, or Contains.
- Value – the value to compare against. For lessons and circles a dropdown lets you pick from existing items. For completion count you enter a number.
A Rule preview below the conditions shows a readable summary of the combined rule. Click the cross next to a condition to remove it.
Delivery Rules tab
Section titled “Delivery Rules tab”Delivery rules (When NOT to Send) are optional conditions checked just before sending. If any delivery condition is met the notification is not delivered. This is useful for suppressing notifications that are no longer relevant (for example, skipping a reminder if the user already completed the lesson).
- Use delivery conditions – check to enable delivery rule evaluation.
- When enabled, the same condition builder used for trigger rules appears, with the same condition types and operators.
- A badge on the tab shows the number of active delivery conditions.
Testing delivery conditions
Section titled “Testing delivery conditions”For saved rules you can click Test Delivery Conditions to open a test dialog. In the dialog:
- Search for and select a user.
- Click Run Test.
- The result shows whether the notification would be sent or not, along with the outcome of each individual condition.
Notification preview
Section titled “Notification preview”The Notification Preview dialog, opened with Preview Notification on the Content tab, shows a Mobile View of the notification so you can see how it will look to end users. Template variables are replaced with sample data (for example, {{LessonTitle}} becomes “Introduction to Mindfulness”).
If a push notification is configured, the dialog has a second Push Notification tab showing the push notification title and message.
Related topics
Section titled “Related topics”- Notifications and Alerts – How notifications and alerts fit into the broader platform.
- Multilingual text – Language tabs on confirm and cancel button labels.