

Billing
The Billing section gives you a central place to review invoices, update your organization’s billing information, check your subscription and seat usage, manage invoice recipients, and monitor costs. Open it from the sidebar by selecting Billing; the page is called Billing Management.
Tabbed layout
Section titled “Tabbed layout”The Billing page uses a tabbed interface. The first five tabs are always visible:
- Invoices – View and export your invoices.
- Billing Details – Edit the company information that appears on invoices.
- Subscription – See your plan and how many practitioner and client seats are in use.
- Contacts – Manage the people who receive invoice emails.
- Tenant Codes – Browse and export the access codes linked to your invoices.
Two additional tabs appear when the matching pricing model is configured for your workspace:
- Pricing – Visible when code-based pricing is active. Shows per-code prices and cost estimates.
- MAU Tiers – Visible when MAU (Monthly Active Users) pricing is active. Shows flat-fee tiers based on user counts.
Which pricing model your workspace uses depends on your feature configuration. Contact your Afterglow representative if you are unsure which model applies.
When your workspace is close to (or at) its practitioner or client seat limit, a banner above the tabs tells you so.
Invoices
Section titled “Invoices”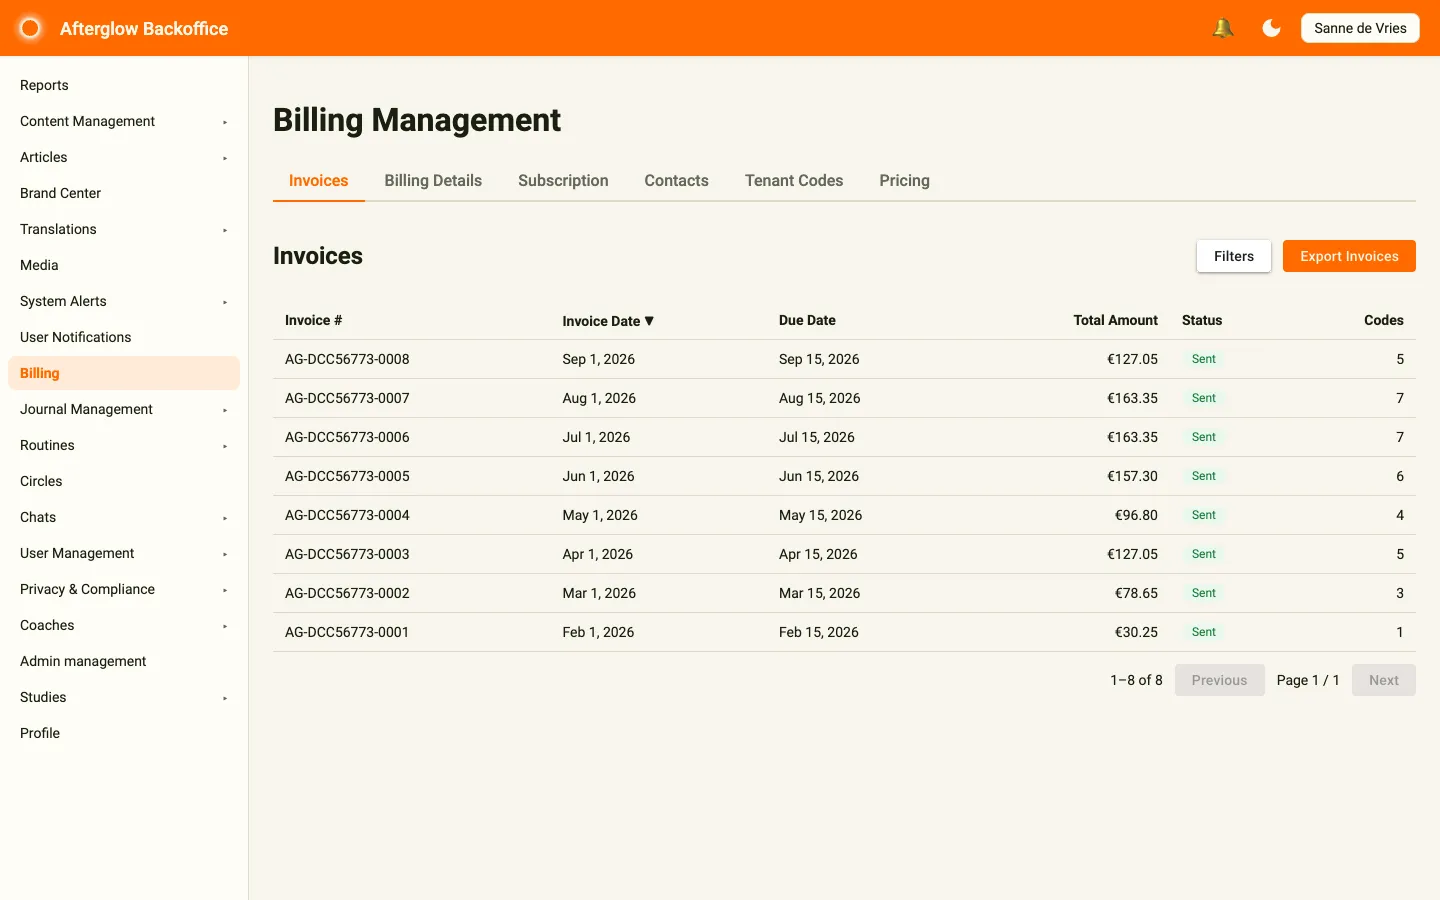
The Invoices tab lists all invoices for your workspace, sorted by invoice date (newest first). Click the Invoice #, Invoice Date, Due Date, or Total Amount column header to sort by that column; click again to reverse the order.
Columns
Section titled “Columns”- Invoice # – The unique invoice number.
- Invoice Date – The date the invoice was generated.
- Due Date – The payment due date.
- Total Amount – The invoice total including VAT.
- Status – A colored badge showing Sent (green) or Not Sent (amber).
- Codes – The number of tenant codes associated with the invoice.
Filtering
Section titled “Filtering”Click Filters to show the filter panel and narrow results by:
- Start Date / End Date – Limit to a date range.
- Sent Status – Show only sent or not-sent invoices.
- Min Amount / Max Amount – Filter by total amount.
- Search Invoice Number – Search by invoice number text.
Click Apply Filters to update the list. The list returns to the first page automatically.
Exporting
Section titled “Exporting”Click Export Invoices above the grid to download all invoices matching the current filters as a CSV file.
Viewing an invoice
Section titled “Viewing an invoice”Click any row to open the invoice detail page.
Invoice detail
Section titled “Invoice detail”The invoice detail page shows complete information for a single invoice. Click Back to return to the invoice list.
Invoice Details
Section titled “Invoice Details”Displays the invoice number, invoice date, due date, status badge, and the sent date (if the invoice has been sent).
Billing Information
Section titled “Billing Information”Shows the company name, address, and VAT number from your billing details.
Line Items
Section titled “Line Items”A table of all charges on the invoice with columns for description, quantity, unit price, and total. Below the table you will see the subtotal, VAT amount (with the percentage), and the grand total.
Associated Tenant Codes
Section titled “Associated Tenant Codes”If the invoice has linked tenant codes, a separate card lists them with columns for code, type, user, created date, and redeemed date. Click Export Codes to download the codes as a CSV file.
Download
Section titled “Download”Click Download to open the invoice as a PDF in a new browser tab for saving or printing.
Billing Details
Section titled “Billing Details”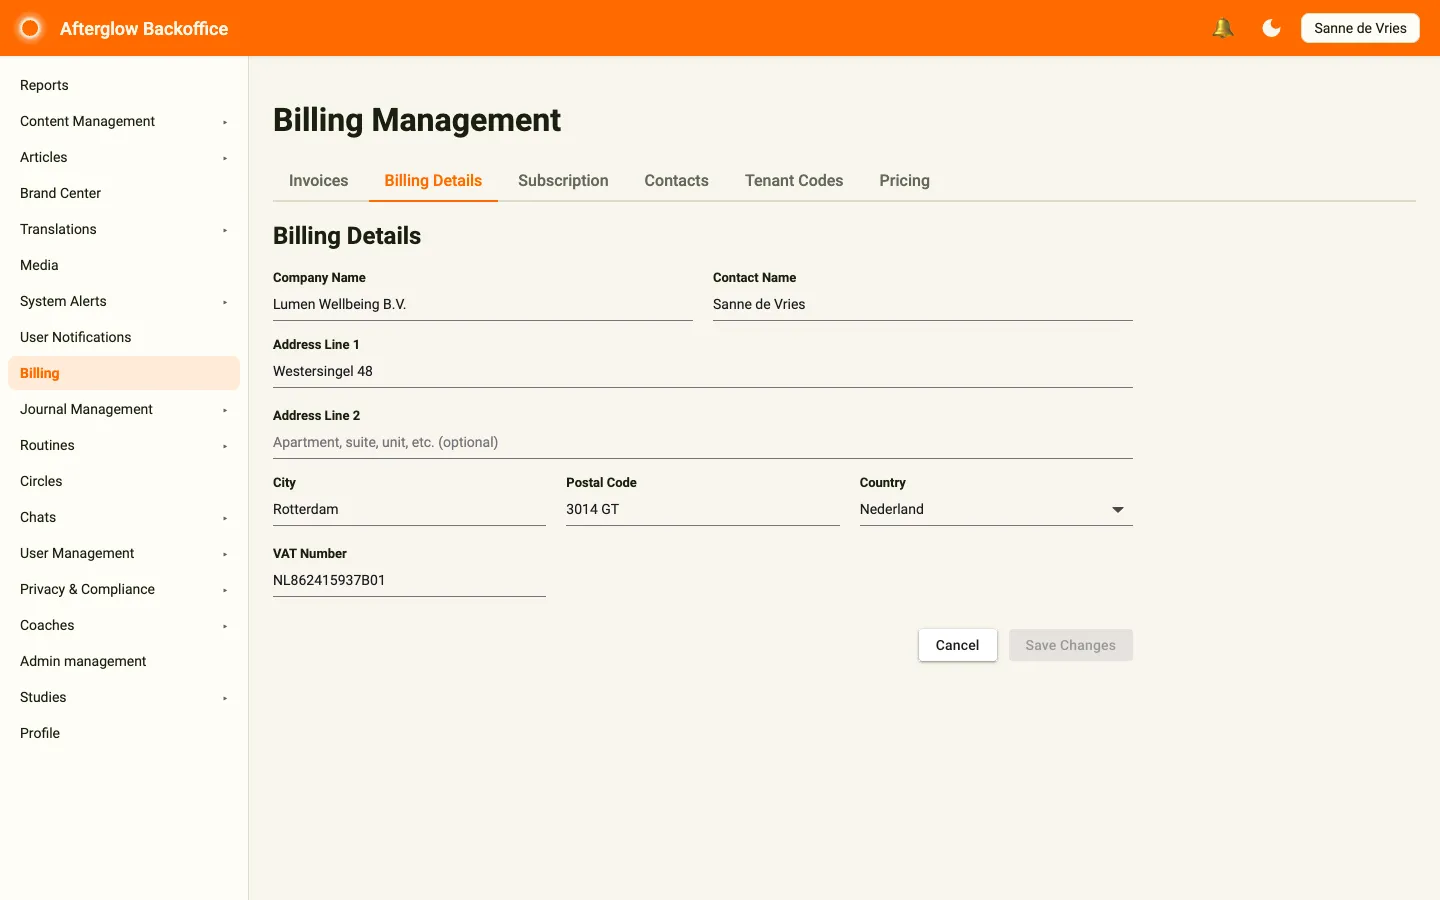
The Billing Details tab lets you view and edit the company information that appears on your invoices.
Fields
Section titled “Fields”- Company Name (required) – Your organization’s legal name.
- Contact Name – The billing contact person.
- Address Line 1 – Street address.
- Address Line 2 – Apartment, suite, or unit (optional).
- City – City or town.
- Postal Code – Postal or ZIP code.
- Country – Select from the country dropdown.
- VAT Number – Your tax identification number. Must start with a two-letter country code followed by digits or capital letters (for example,
NL123456789B01).
Click Save Changes when you are done. The button is disabled until you change at least one field and all validation passes. Click Cancel to discard unsaved edits and return to the Invoices tab.
Subscription
Section titled “Subscription”The Subscription tab shows the plan your workspace is on and how many seats you use:
- Subscription Tier – Your current tier (Starter, Growth, or Bespoke), with the practitioner and client limits of each tier.
- Bespoke Overrides – For the Bespoke tier, the agreed maximum number of practitioners and clients. An empty field means unlimited.
- Current Usage – How many practitioner and client seats are in use, out of the limit, and how many remain.
Contacts
Section titled “Contacts”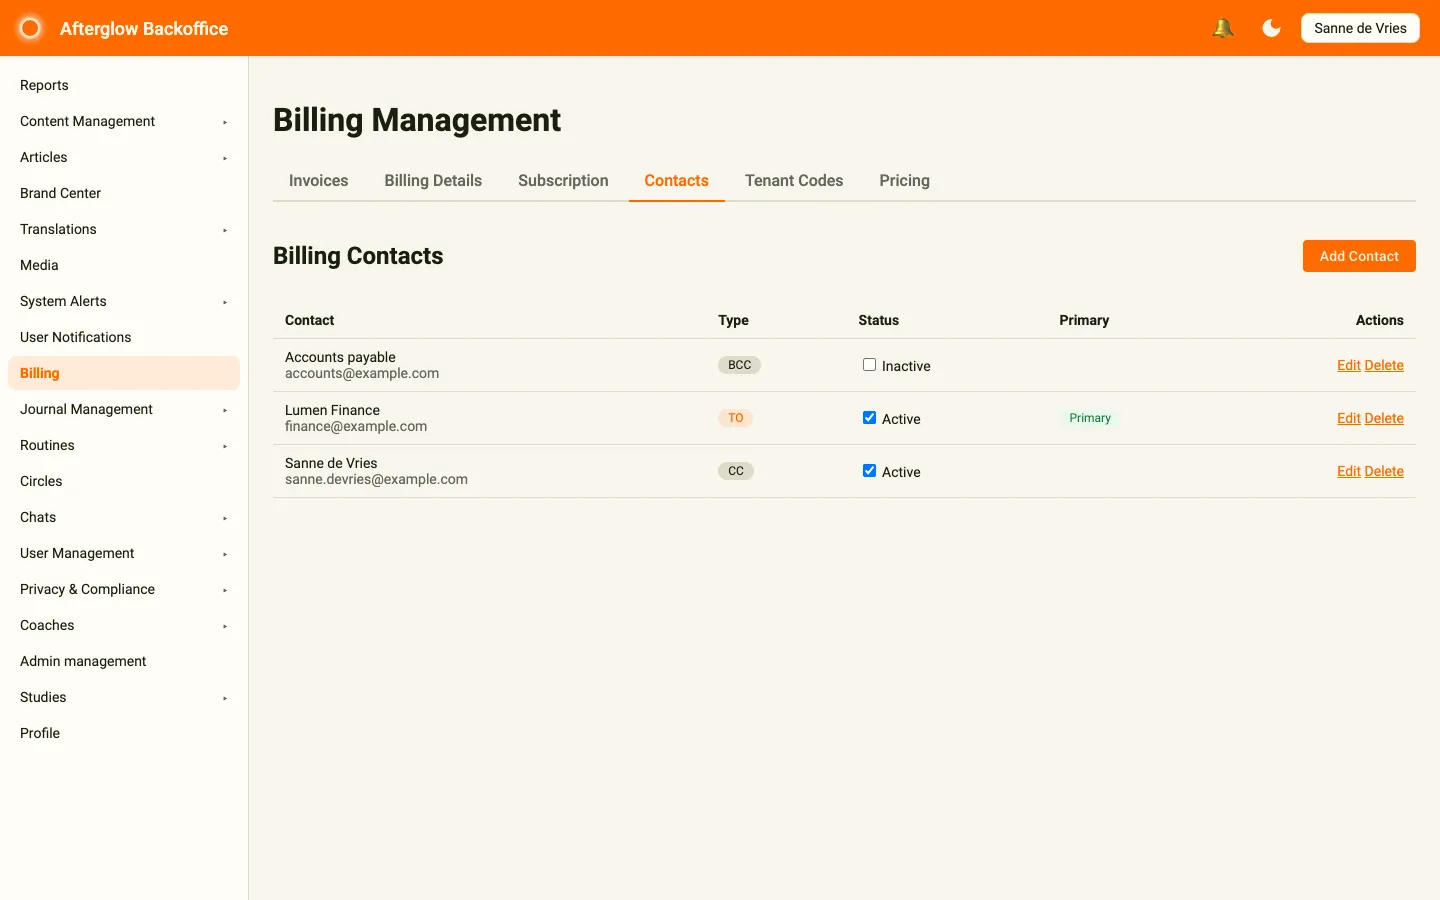
The Contacts tab manages the email recipients who receive invoice communications.
Contacts table
Section titled “Contacts table”Each contact row shows:
- Contact – Name and email address.
- Type – A badge indicating TO (primary recipient), CC (carbon copy), or BCC (blind carbon copy).
- Status – A checkbox to activate or deactivate the contact.
- Primary – A badge for the primary contact. Only one active TO contact can be primary at a time.
- Actions – Edit and Delete links, plus Set as Primary on active TO contacts that are not primary yet.
Adding a contact
Section titled “Adding a contact”Click Add Contact to open the Add Billing Contact dialog with the following fields:
- Email Address (required) – Must be a valid email.
- Contact Name – Optional display name.
- Recipient Type – Choose To, CC, or BCC.
Editing a contact
Section titled “Editing a contact”Click Edit on a contact row. The Edit Billing Contact dialog shows the same fields as the add dialog, plus an Active switch.
Setting a primary contact
Section titled “Setting a primary contact”The primary contact is an active TO contact that you mark as primary. To change the primary contact, click Set as Primary on a different active TO contact.
Deleting a contact
Section titled “Deleting a contact”Click Delete and confirm the deletion in the dialog that appears.
Tenant Codes
Section titled “Tenant Codes”The Tenant Codes tab provides a full view of all access codes associated with your workspace. Click a sortable column header (Code, Type, User Name, Active, Billed, or Created) to sort the list.
Columns
Section titled “Columns”- Code – The code string.
- Type – The code type (Normal, Premium, or Upgrade).
- User Name – The user who redeemed the code, or Not redeemed.
- Email – The user’s email address, or Not redeemed.
- Active – A badge showing Active or Inactive.
- Billed – A badge showing Billed or Unbilled.
- Invoice # – The invoice number the code was billed on (links to the invoice detail page).
- Created – When the code was created.
- Redeemed – When the code was redeemed (blank if not yet redeemed).
Filtering
Section titled “Filtering”Use the filter panel above the list to narrow results:
- Start Date / End Date – Filter by code creation date range.
- Code Type – Filter by Normal, Premium, or Upgrade.
- User Search – Search by user name, email, or code text.
- Invoice Number – Filter by associated invoice number.
- Active – Show All, Active, or Inactive codes.
- Billed – Show All, Billed, or Unbilled codes.
The list updates as soon as you change a filter. Click Clear All to reset all filters at once.
Exporting
Section titled “Exporting”Click Export CSV to download the codes matching the current filters as a CSV file.
Pricing
Section titled “Pricing”The Pricing tab is only visible when your workspace uses code-based pricing.
Current Billing Cycle
Section titled “Current Billing Cycle”At the top of the Pricing Overview a summary card displays:
- Cycle Period – The current monthly billing window (first to last day of the month).
- Total Unbilled Codes – How many redeemed codes have not yet been invoiced.
- Estimated Cost – The projected total for the current cycle based on unbilled codes and configured prices.
Pricing by Code Type
Section titled “Pricing by Code Type”Below the summary, a card for each code type (Normal, Premium, Upgrade) shows:
- Price per code – The configured unit price.
- Unbilled codes – The number of redeemed but not-yet-billed codes of this type.
- Current subtotal – Price multiplied by unbilled codes.
How billing works
Section titled “How billing works”- Billing cycles run monthly from the 1st to the last day of each month.
- Invoices are generated automatically at the end of each cycle.
- Only redeemed codes are included in billing calculations.
- Cost estimates update in real time as codes are redeemed.
MAU Tiers
Section titled “MAU Tiers”The MAU Tiers tab is only visible when your workspace uses MAU-based (Monthly Active Users) pricing.
Current Billing Period
Section titled “Current Billing Period”A summary card at the top of MAU Pricing Tiers displays:
- Period – The current monthly billing window.
- Current MAU – The number of unique non-admin users who have accessed the platform this period.
- Current Tier Fee – The flat fee for the tier that matches your current MAU count.
Your Pricing Tiers
Section titled “Your Pricing Tiers”A table lists every configured tier with columns:
- User Range – The minimum and maximum user count for the tier (for example, “1 - 500 users” or “5,001+ users”).
- Flat Fee – The monthly charge if your MAU falls within this range.
- Status – Shows Current Tier for the matching tier, Active for other enabled tiers, or Inactive for disabled tiers.
The row for your current tier is highlighted so you can see where your organization falls at a glance.
How MAU tier billing works
Section titled “How MAU tier billing works”- MAU is the count of unique users who accessed the platform during the billing period. Admin users are excluded from this count.
- Pricing tiers define a flat fee based on your MAU count falling within a specific range.
- Only one tier applies per billing period – the one matching your MAU count.
- Tiers are evaluated at the end of each billing cycle when generating invoices.
Related topics
Section titled “Related topics”- Roles and Permissions – Which roles can open the Billing section.
- User Management – Generating and inviting with the codes that appear on your invoices.