

Brand Center
The Brand Center lets you tailor the look and feel of the mobile app for your organization. You can set brand colors, choose fonts, assign banner images, and configure videos — all with a live phone preview so you can see changes before publishing.
Who has access?
Section titled “Who has access?”Brand Center is available to Admin and SuperUser roles. See User Roles for a full comparison.
Page layout
Section titled “Page layout”The Brand Center page is split into two areas:
- Left panel — Four tabs (Colors, Typography, Banners, Videos) where you make changes.
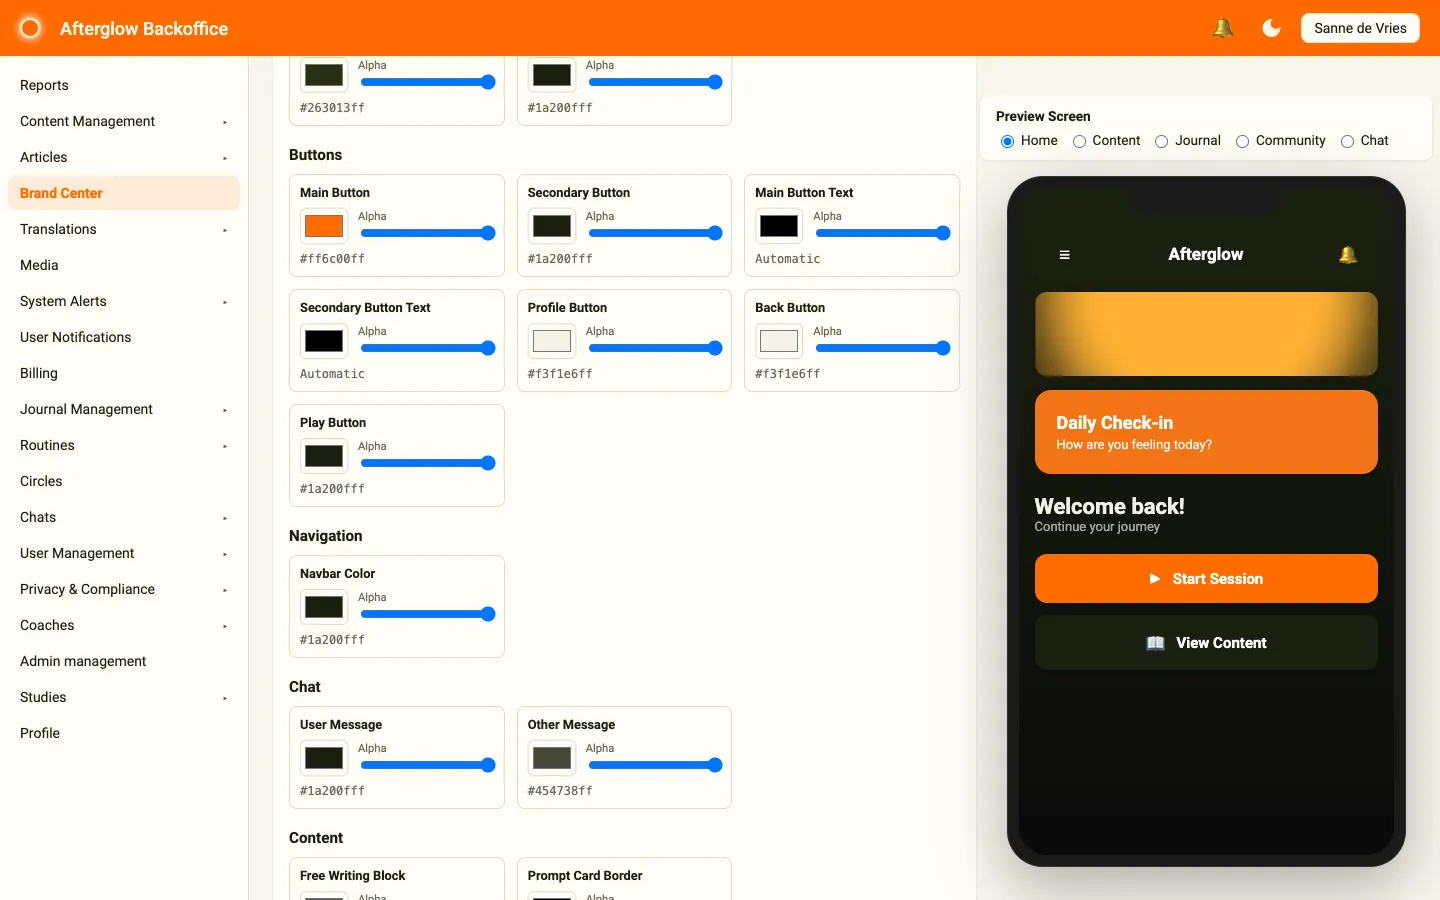
- Right panel — A live phone mockup that previews your changes across five app screens: Home, Content, Journal, Community, and Chat.
Use the Preview Screen radio buttons above the phone mockup to switch between preview screens.
Colors
Section titled “Colors”The Colors tab controls every color in the mobile app. Colors are organized into groups so you can find what you need quickly.
Color groups
Section titled “Color groups”| Group | What it controls |
|---|---|
| Brand Colors | Highlight Color (primary brand accent) and Secondary Highlight |
| Text Colors | Default text on light backgrounds and dark backgrounds |
| Background | Main background, top and bottom gradient colors, backdrop overlay, and modal background |
| Buttons | Main button, secondary button, main button text, secondary button text, profile button, back button, and play button |
| Navigation | Navbar background color |
| Chat | User message bubble and other user’s message bubble |
| Content | Free writing answer block and prompt card border |
Each color has a swatch and an Alpha slider. Click the swatch to open a color picker, and use the slider to set how transparent the color is. The current value is shown as a hex code below the swatch.
The Main Button Text and Secondary Button Text colors are optional. They start as Automatic, which means the app picks dark or light text depending on how light the button color is, so the label stays readable. Pick a color to choose the text color yourself, or click Reset to go back to Automatic. The phone preview shows the button text in the color the app will use.
Color presets
Section titled “Color presets”At the bottom of the Colors tab you will find the Color Presets panel. Presets let you save and restore complete color schemes.
- Save a preset — Enter a name in the New preset name field and click Save as New Preset. This stores all current color values.
- Load a preset — Select a preset from the dropdown and click Load. All colors update instantly.
- Delete a preset — Select a preset and click Delete. You are asked to confirm before it is deleted.
Typography
Section titled “Typography”The Typography tab controls which fonts are used for each text style in the mobile app. You can assign a different font to each of the following styles:
- H1 through H5 — Heading levels from largest to smallest.
- Paragraph — Standard body text.
- Sub-Paragraph — Smaller supporting text.
- Tiny — Captions and fine print.
For each style, select a font from the dropdown, or None to use the app’s default font. The dropdown lists the font files uploaded to your Media library. After selecting a font, a live preview shows how that font renders at the appropriate size.
Banners
Section titled “Banners”The Banners tab lets you assign banner images to four sections of the mobile app:
- Home Banner
- Content Banner
- Journal Banner
- Community Banner
Each banner slot shows a thumbnail preview of the currently assigned image (or a placeholder if none is set).
To assign a banner:
- Click Select (or Change if one is already assigned) on the banner slot.
- Browse the Media Library grid below the banner slots.
- Click an image to assign it.
To remove a banner, click Remove on the slot.
You can also upload new images directly from this tab using the Upload Image button above the media library grid.
Videos
Section titled “Videos”The Videos tab lets you assign a video that plays after user onboarding completes. This is the After Onboarding video — a short clip that welcomes new users to your platform.
To assign a video:
- Select a video from the After Onboarding dropdown, or click a video in the Video Library grid below.
- A preview player appears so you can verify the video.
To remove the video, click Remove Video.
Use the Upload Video button to add new videos directly from this tab.
Saving and publishing
Section titled “Saving and publishing”Changes in the Brand Center follow a two-step workflow:
-
Save — When you modify any setting, a banner appears at the bottom of the left panel showing “You have unsaved changes.” Click Save to persist your changes, or Revert to discard them.
-
Publish — After saving, click the Publish styling button at the top-right of the page. This pushes your updated branding to all mobile app users. You are asked to confirm before publishing.
Related topics
Section titled “Related topics”- Media — Uploading images, videos, and fonts used in the Brand Center.