Tenant Setup
Setting up a new Afterglow tenant involves choosing a platform mode, enabling features, applying your branding, and inviting your team.
Prerequisites
Section titled “Prerequisites”Before you begin, make sure you have:
- A SystemAdmin or Admin account with access to the Backoffice.
- Your brand assets ready (logo, colors, fonts, and banner images).
Step 1 — Choose your platform mode
Section titled “Step 1 — Choose your platform mode”The platform mode determines the overall shape of your Afterglow environment. There are two options:
- Platform Mode — Full content management with all features, including articles, translations, billing, and community tools. Choose this if your organization delivers structured learning programs alongside coaching.
- Coach Mode — A streamlined experience focused on client coaching. Navigation is simplified to show only coaching-related pages. Choose this if your primary use case is one-on-one or group coaching.
To set the mode, open the Mode Management page in the Backoffice sidebar (visible to SystemAdmins only). Select the mode that fits your use case and confirm the change. The navigation updates immediately for all Backoffice users.
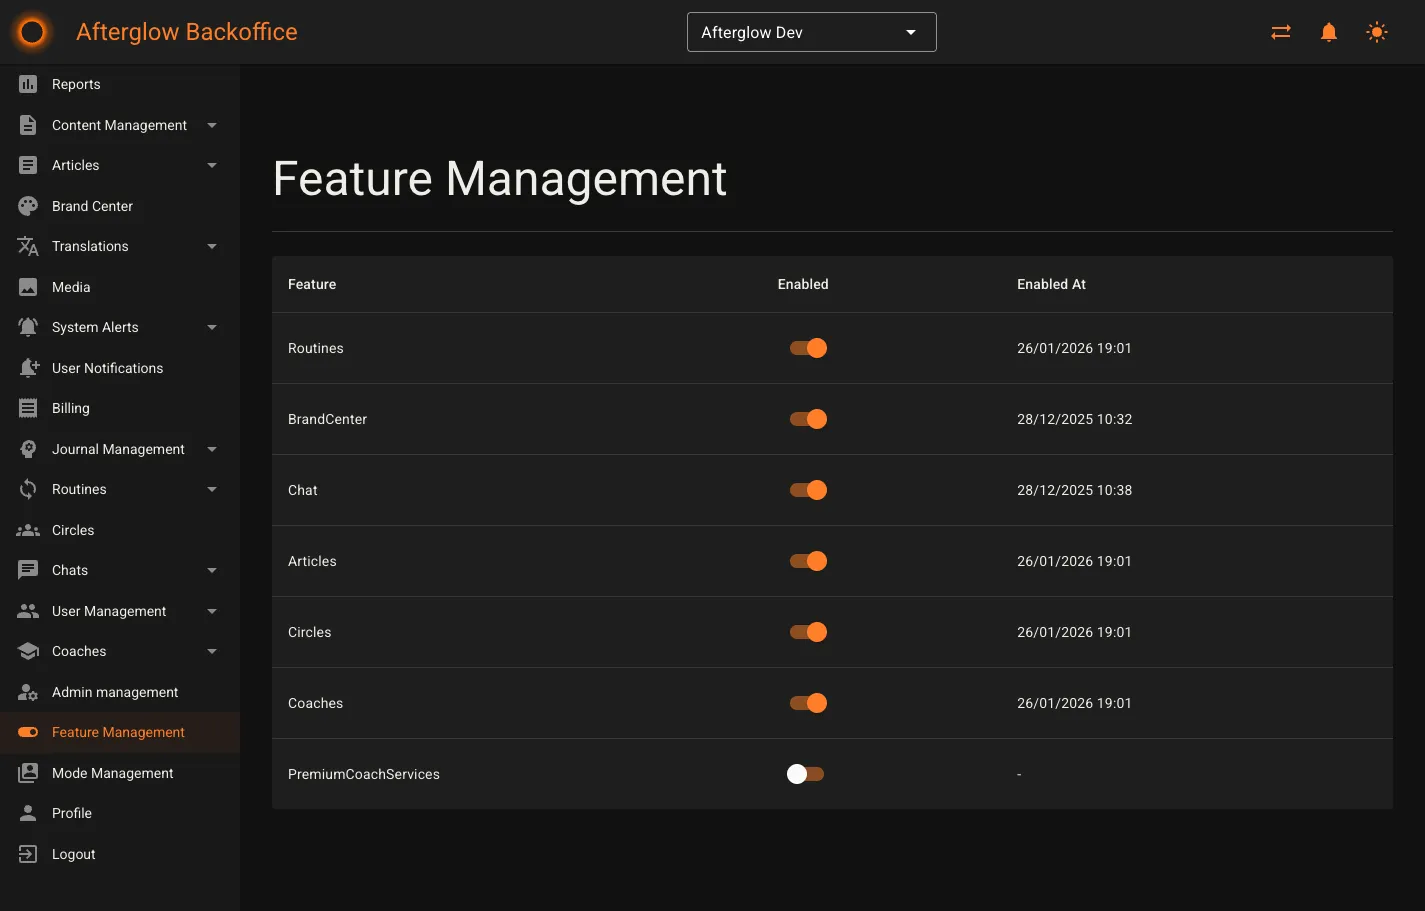
Step 2 — Enable features
Section titled “Step 2 — Enable features”The Feature Management page lets you turn individual features on or off for your tenant. Each feature controls whether the corresponding section appears in the Backoffice navigation and the mobile app.
The available features are:
| Feature | What it does |
|---|---|
| Routines | Task templates and substance tracking for daily routines. |
| Brand Center | Visual branding tools (colors, fonts, banners, videos). |
| Chat | One-on-one and circle-based messaging. |
| Articles | Standalone content pieces like blog posts or knowledge base entries. |
| Circles | Group spaces for community interaction. |
| Coaches | Coach profiles, bookings, and client management. |
| Premium Coach Services | Paid coaching sessions and premium service offerings. |
To enable or disable a feature, go to Feature Management in the Backoffice sidebar (SystemAdmin only) and toggle the switch next to each feature. Changes take effect immediately.
Step 3 — Set up branding
Section titled “Step 3 — Set up branding”The Brand Center lets you customize the look and feel of your Afterglow app. It is organized into four tabs:
- Colors — Customize 19 color values including text colors, button colors, background colors, gradients, and accent colors. A live phone preview on the right shows your changes in real time.
- Typography — Choose font families for headings (H1 through H5), paragraphs, sub-paragraphs, and tiny text.
- Banners — Set banner images for the Home, Content, Journal, and Community sections of the app.
- Videos — Add tenant-specific videos that appear in the app.
After making changes, click Save to store your edits. When you are ready for users to see the changes, click Publish to push the updated styling live.
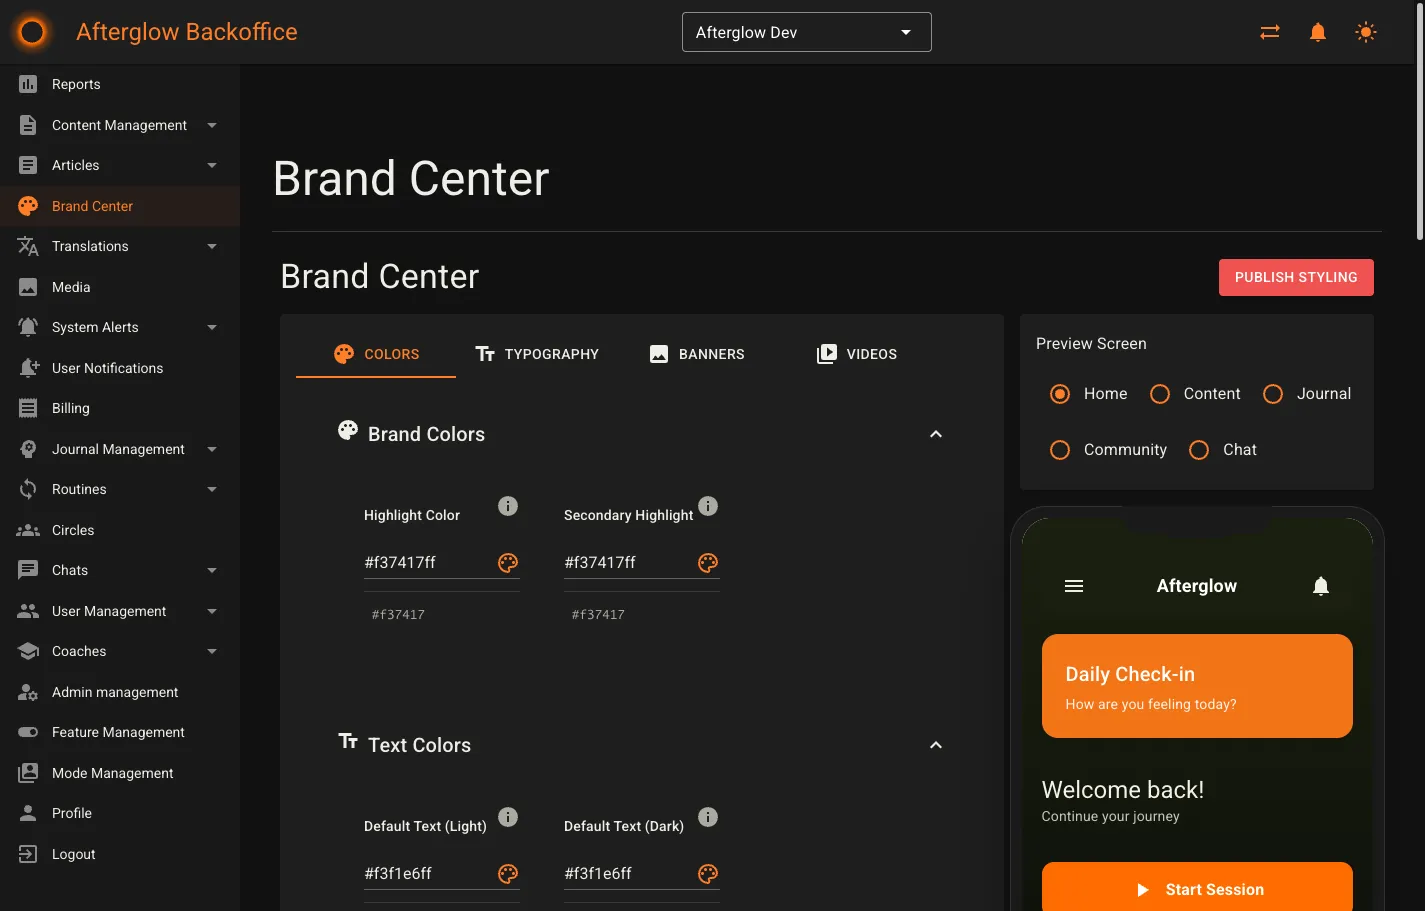
For a full walkthrough of each tab, see Brand Center.
Step 4 — Configure translations
Section titled “Step 4 — Configure translations”Afterglow supports text customization so you can tailor the language used throughout the app to match your brand voice. The Translations section in the Backoffice lets you override default text strings and manage translation styling.
For full details, see Translations.
Step 5 — Invite administrators
Section titled “Step 5 — Invite administrators”Once your tenant is configured, invite team members to help manage it. Open the Admin Management page and fill in the invitation form:
- Enter the person’s email address and name.
- Optionally set a password — if you leave this empty, the person receives a password reset email.
- Select a role:
- Admin — Full tenant management including content, users, coaches, and admin accounts. Can also access the Coach Portal.
- Super user — Content and user management including media, translations, and system alerts.
- User — Basic access to reports and their own profile.
- Coach — Coach Portal access for managing clients, coaching data, and bookings.
- Click Invite admin to send the invitation.
For more on what each role can do, see Roles and Permissions.
Step 6 — Set up billing
Section titled “Step 6 — Set up billing”If your tenant uses paid features or subscriptions, configure billing details in the Billing section. This is where you manage invoices and payment settings.
For full details, see Billing.
Next steps
Section titled “Next steps”Your tenant is now set up and ready for content. Depending on your role, continue with one of these guides:
- First Steps: Admin — Learn how to create your first content modules and manage users.
- First Steps: Coach — Set up your coaching practice and start working with clients.